The Milky Way is probably the most photographed night sky subjects among astro photographers. If you see the Milky Way in a dark sky region you can see its details with the naked eye. Ambiant light such as city lights will prevent the details from being visible or not seen at all.
Light pollution is the #1 enemy when photographing the Milky Way. The best way to view or photograph the Milky Way is to be in a dark environment. If you live near a large city, you will need to travel to get away from the lights.
Many people live in or near cities which makes viewing the Milky Way near impossible. The lights wash out most of the stars which makes viewing the Milky Way difficult.
The image below was taken in the mountains above Ridgecrest, CA in April 2022. With the naked eye, the city lights didn’t look near this bright. This shot was taken with the following settings:
Time Taken = 3:10am
Canon EOS R camera
Canon 16-35mm lens
Focal Length = 16mm
Exposure Time = 13 seconds
Aperture = f/2.8
ISO = 6400

Why does light pollution matter?
This is a really good question. Take the above image for example, when we were looking across the city that morning, the lights didn’t appear that bright. Why? Our eyes are looking at the scene in the immediate moment, or just this second. When we shoot the Milky Way in photography we aren’t taking an instant quick photo.
The reason light pollution matters is because how long we take a photo. We shoot the Milky Way with long exposures. This means the camera takes one photo for multiple seconds. Using a wide aperture of f/2.8 with an exposure time of 13 seconds, we will gather a lot of light. The camera lens will soak in the surrounding light for an extended period of time. Due to the long exposure, our image will become saturated with light.
The image below was shot from the same location as the first image just a few minutes later. The settings for this photo was:
Time Taken = 3:10am
Canon EOS R camera
Canon 16-35mm lens
Focal Length = 16mm
Exposure Time = 13 seconds
Aperture = f/2.8
ISO = 3200

The only difference with this photo was my ISO settings. I lowered my ISO setting to 3200 while all other settings remained the same. By lowering my ISO I lowered the city lights in the image, but I also lost some detail in the Milky Way.
The photos above were my first time shooting the Milky Way. Since then I have shot the Milky Way several more times. I have taken photos from darker environments and have seen noticeable differences. View my First Milky Way Photoshoot article.
Milky Way Photos in Death Valley
In May of 2022 we camped out in Death Valley to shoot the Milky Way late at night. The scene was much different than the month before when we shot it above Ridgecrest. This time we were under dark skies with little light to interfere. When we setup in the sand dunes the sky and everything surrounding us was nearly total darkness. The only lights we saw with our naked eyes were the stars and Milky Way above.
Once we began shooting we quickly discovered the Las Vegas lights were giving off pollution. The Vegas lights put off a glow over the horizon in the direction of the Milky Way. This was unfortunate but the brightness was much less than the month before.
The image below was taken with the following settings:
Time Taken = 1:45am
Canon EOS R camera
Canon RF 15-35mm lens
Focal Length = 35mm
Exposure Time = 13 seconds
Aperture = f/2.8
ISO = 6400

With less light pollution the Milky Way details are more noticeable and highlights the image better. In this photo your attention is drawn to the Milky Way rather than ground light. View my Death Valley Photoshoot article.
Father’s Day Evening Milky Way Photos
A great way to close-out Father’s Day was to take a short drive out of town to shoot the Milky Way. I found a nice valley location surrounded by rocky hills all around. This was a great spot because it was only a few minutes drive and I could avoid the city lights. The location is less than five minutes south of the city and my camera faced away from the city lights. This made for an ideal dark place close to home.
The photo below was the best shot of the night while lighting the foreground with my UV light. This photo was shot with the following settings:
Time Taken = 10:15pm
Canon EOS R camera
Canon RF 15-35mm lens
Focal Length = 35mm
Exposure Time = 15 seconds
Aperture = f/2.8
ISO = 6400

This photo was about avoiding the city lights and staying close to home. I was only a few minutes away but the dark skies was related to the direction of my camera. With the Milky Way in the south I was able to face the camera away from the city avoiding the lights. I was in a valley surrounded by hillsides which blocked the city lights from affecting my shot.
In a large city you will most likely need to get farther away due to much larger amounts of light. If there are other cities located nearby in the direction you are shooting, those lights will affect your shot.
City Lights in Distance Affecting Photo
I took some friends out to shoot the Milky Way in June on train tracks in the desert. From this direction we were picking up lights from Lancaster & Palmdale, CA. These are larger cities that put off too much light pollution and negatively affect night sky photos. By turning down the highlights I was able to turn down the light some. The photo below was taken with the following settings:
Time Taken = 9:30pm
Canon EOS R camera
Canon RF 15-35mm lens
Focal Length = 35mm
Exposure Time = 15 seconds
Aperture = f/2.8
ISO = 3200

Arches National Park Milky Way Photo
In late July I had the chance to visit Arches National Park in Moab, UT. This NP is known for some of the darkest skies in the United States. This visit granted me the opportunity to test it out myself.
When the sun set over the horizon the night sky lit up. The stars were bright and the Milky Way glowed. This offered tremendous dark skies and the Milky Way appeared the brightest I have seen. There was no ambient light in any direction making excellent conditions for shooting the Milky Way.
Camera settings for the below photo were:
Time Taken = 10:30pm
Canon EOS R camera
Canon RF 15-35mm lens
Focal Length = 35mm
Exposure Time = 20 seconds
Aperture = f/2.8
ISO = 3200

View my Arches National Park article.
Big City Lights

The photo above was taken in Greenfield, IN about a 15 minute drive east of Indianapolis. The Milky Way was sitting just over the top of the trees. This photo was taken a little after 11pm and the sky was still bright from the city lights. I tried many different settings but could never capture a photo of the Milky Way here.
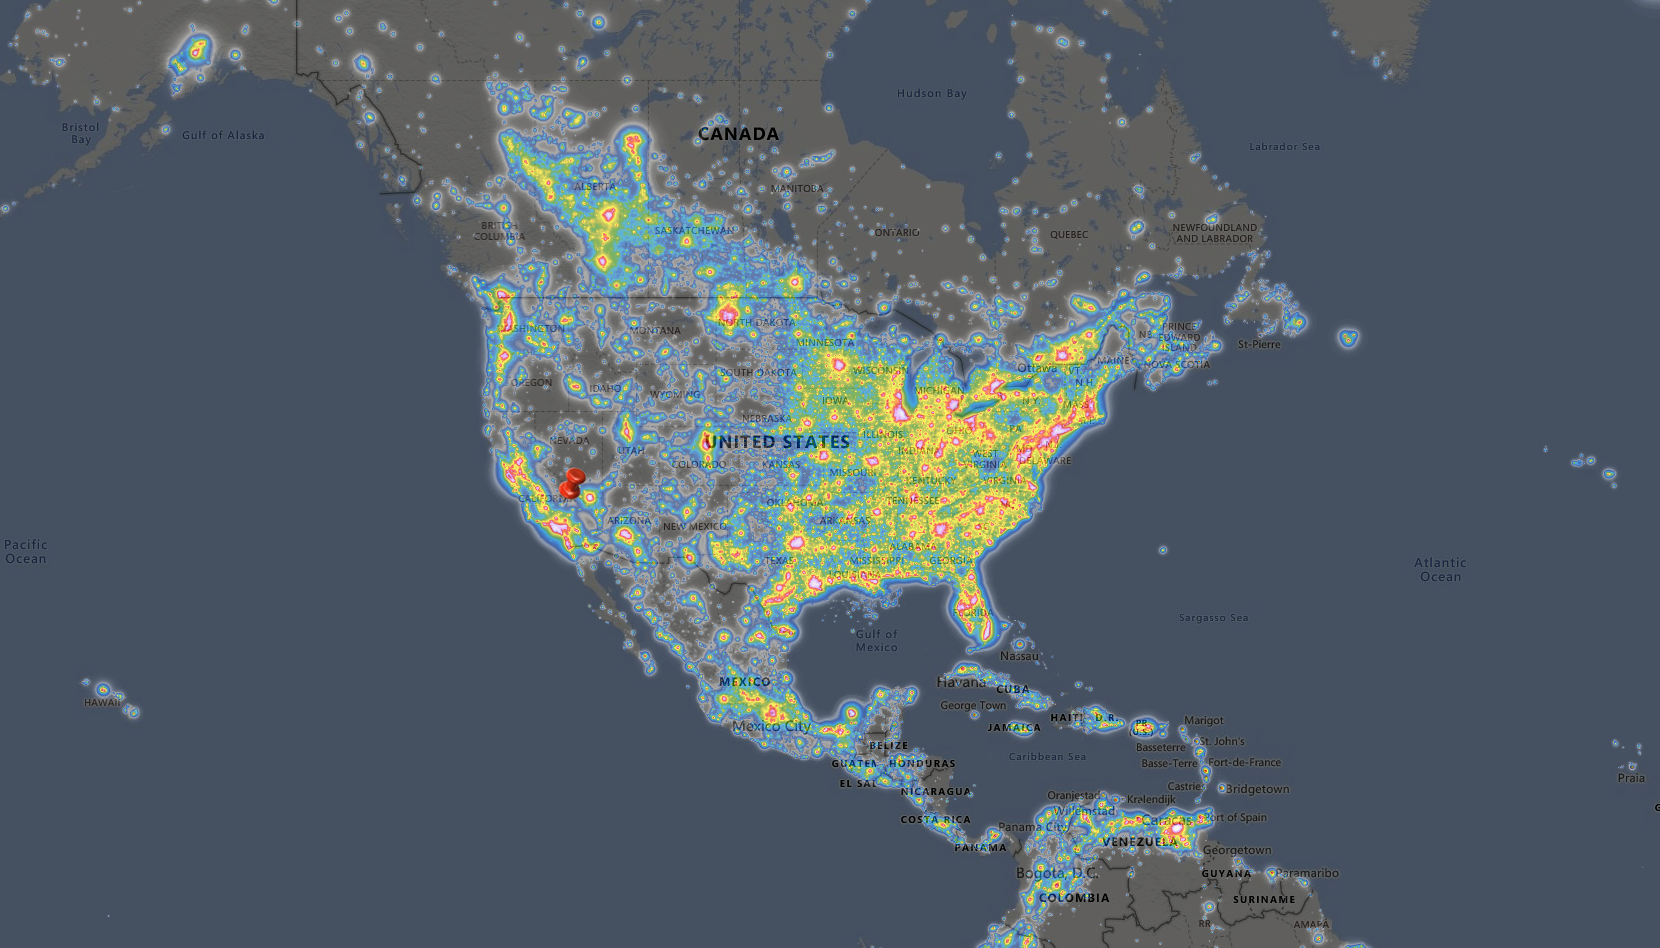
It is a good idea to use an app to find the best location to find the darkest skies. There are several apps available to locate the best astro viewing skies. I like using the Light Pollution Map which works great, and it is free to use. Download the app on your phone to take with you on your night photo shoots.
The map below is what this map looks like. As you can tell, the best locations in the U.S. are in the western states.

Comparisons
So far this year I have the opportunity to shoot the Milky Way from several locations offering different environments. Below is a comparison of photos shot this year in order.
 | 4/5/2022 Ridgecrest, CA |
 | 5/7/2022 Death Valley National Park, CA |
 | 6/19/2022 Ridgecrest, CA |
 | 6/28/2022 Train Tracks Searles Station, CA |
 | 7/16/2022 Arches National Park, UT |
 | 7/27/2022 Joshua Trees in Walker’s Pass, CA |
Summary
The best way to sum up light pollution is it directly affects viewing or photographing the Milky Way. The darker the skies the better viewing and photographing opportunity. When the sky is darkest, the stars and Milky Way come to life with brilliant light in the sky.
If you live in a city where the light is abundant you will need to get away to escape the lights. Shooting the Milky Way in light pollution isn’t impossible but is more complicated and requires more post editing.
I hope you enjoyed this article and learned something. Shooting the Milky Way is a lot of fun and challenging at times, especially in lighted environments. Please let me know what you think in the comments below and rate this article.